Apache Ant is an open sourced software tool for automatic software build processes, which originated from Apache Tomcat Project in early 2000. It was a replacement for the Unix make build tool and created due to some number of problems with the Unix make. Apache Ant is JAVA library of instruments and Command line to drive processes described in build files as target and extension points dependent upon each other. Manually Windows Install Ant Apache
The primary focus of Apache Ant is to build a Java applications. Apache Supplies many numbers of build in tasks allow to compile, test, run and assemble the Java applications. You can also use for non-java applications.
How to Manually Windows Install Ant
For manually installation of Apache Ant in your system you need some applications. First download the .Zip file from Here.
Just be sure JDK ( Java Development Kit ) installed in your system. Click Here to Download. and check JAVA_Home is configured as Windows environment variable and for how to check it
- First go to left side corner of the screen and right the corner.
- Click on system
- A window will open and Advanced System Settings click on it
- After that small windows open click on advance tab
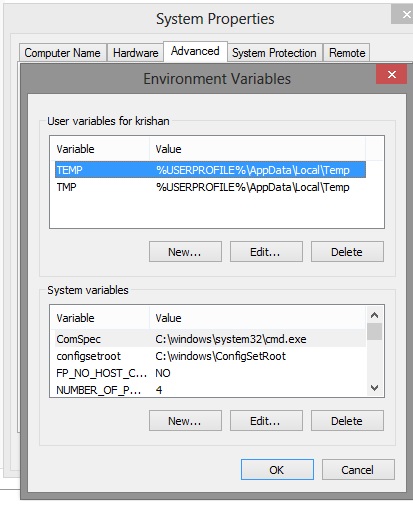
- There you find your System Environment Variables

- Now unzip the the .Zip file that you download from Apache Ant Official site.
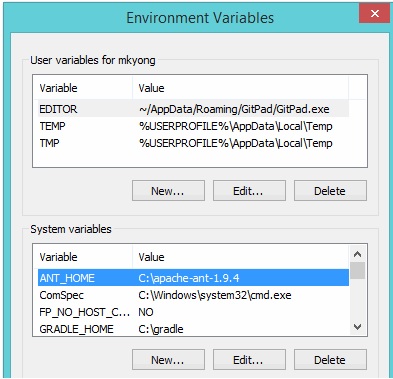
- Add ANT_HOME as the Windows environment variable, and click to your Ant folder.

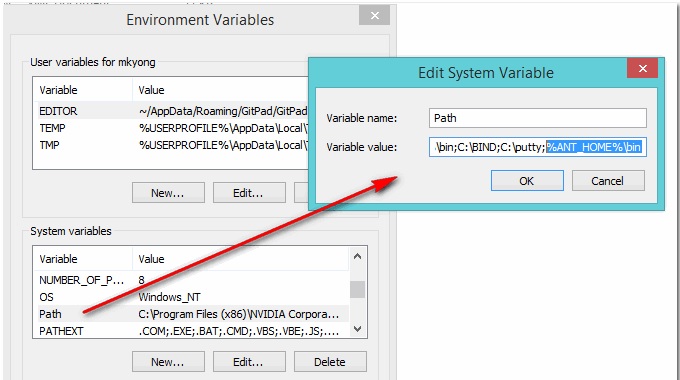
- Update PATH variable, append %ANT_HOME%\bin at the end, so that you can run the Ant’s command everywhere.

- You have to Verify after all this setup.
C:\Users\Kal-El>ant -v
Apache Ant(TM) version 1.9.4 compiled on April 29 2014
Trying the default build file: build.xml
Buildfile: build.xml does not exist!
Build failed
If you see similar type of message. This mean you installed Apache Ant successfully. Hope you find what you’re looking for but if not then comment down below your query. Till than Happy Surfing.


![[Top 9] Chat Forums on Deep Web | Deep Web Chat Rooms | Enter At Your own Risk Top 9 Chat Forums on Deep Web, The Lolita City, onion deep web, dark web lolita, lolita city,](https://www.gadgetgyani.com/wp-content/uploads/2018/03/deep-web-CHAT-FORUMS.jpg)


